
In this guide I’ll walk you through how to hide facebook friend list so other people on Facebook can’t see who you’re friends with. Whether you prefer using your phone, iPad, or desktop, the process is quick and gives you more control over your privacy on the platform. Below I’ll cover the exact steps, explain each privacy option, offer practical tips for different situations, and point out a few limitations to be aware of.
Why you might want to hide facebook friend list
Many people don’t realize that their friend list is often visible by default. Making your social graph publicly visible can lead to privacy issues, unwanted friend requests, or even social awkwardness (for example, when potential employers, acquaintances, or strangers can see who you’re connected to). To avoid that, you can hide facebook friend list so only the people you choose can see it—or so no one sees it at all.
Hiding your friends list is a small change with a noticeable privacy impact. It helps protect your contacts from being exposed, prevents casual snooping, and reduces the chance that someone will use your connections for unsolicited outreach.
Where the setting lives (mobile, desktop, iPad)
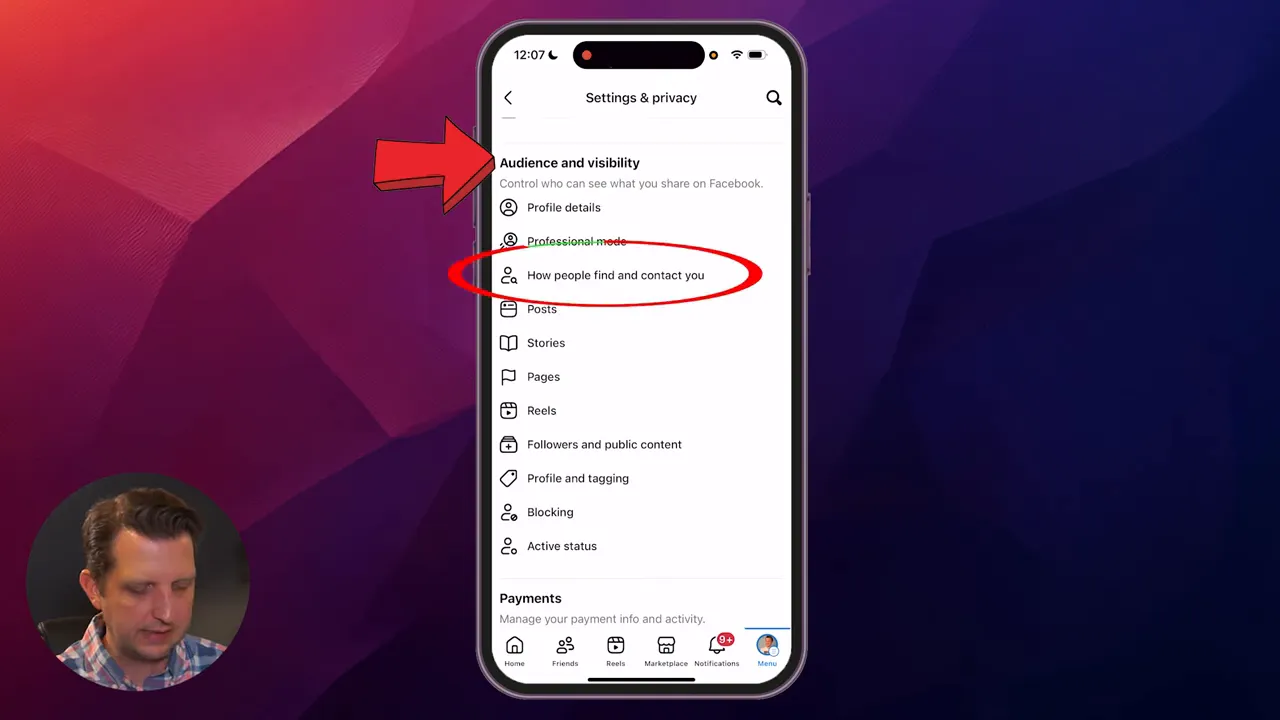
These steps are shown using the Facebook app on a phone, but they work on desktop and tablet as well. The exact labels and placement might look slightly different on desktop, but you’re still going to Settings → Audience and Visibility → How People Find and Contact You. From there you’ll find the control for who can see your friends.
Step-by-step: How to hide facebook friend list
Follow these steps to hide facebook friend list. I’ll include the exact menu path to make it easy to follow regardless of device.
- Open the Facebook app (or go to Facebook on desktop or iPad).
- Tap the menu icon (on mobile it’s usually in the bottom-right corner).
- Scroll and tap “Settings & privacy,” then tap “Settings.”
- Scroll down to the section labeled “Audience and visibility.”
- Tap “How people find and contact you.”
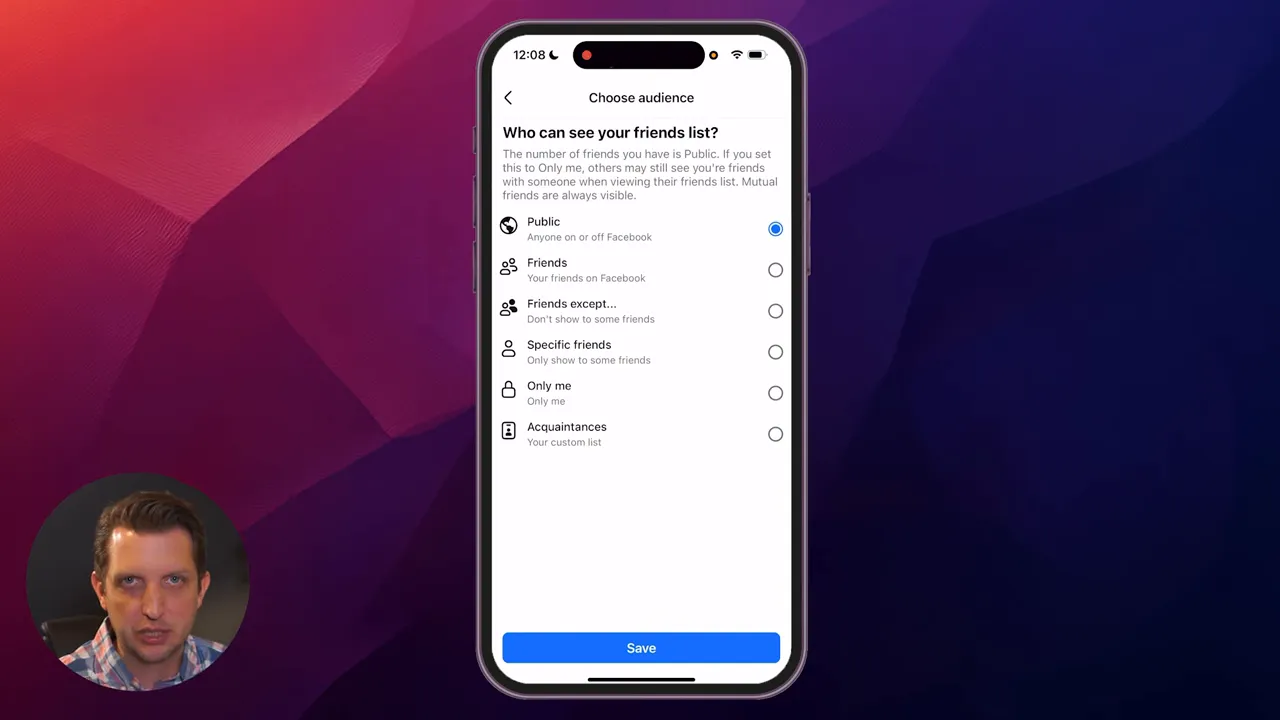
- At the top you’ll see “Who can see your friends list.” Tap that item.
- Choose the privacy option you prefer, then tap “Save.”
That’s it—once you click “Save,” your friends list visibility changes immediately. You’ve successfully hidden your friends list to the audience you selected.
Screenshot: Where to change ‘Who can see your friends list’
Understanding the visibility options
When you tap “Who can see your friends list,” Facebook gives several choices. Here’s what each one means and when you might choose it.
- Public — Anyone on or off Facebook can see your friends. Use this only if you don’t mind full transparency.
- Friends — Only people you’ve accepted as friends can see your list. This is a common middle-ground option.
- Friends except… — Lets you hide your list from specific people in your friends list. Useful if you want most friends to see your connections but exclude a few.
- Specific friends — Only the people you select will be able to see your friends list. Use this for tightly controlled sharing.
- Only me — Makes your friends list fully private so no one else can view it. This is the best option if you want maximum privacy.
- Acquaintances — Lets you hand-pick individuals who count as acquaintances and give them viewing rights. This one is less commonly used but handy in specific scenarios.
If your goal is to hide facebook friend list from everyone, pick “Only me.” If you want colleagues to still see it but hide it from certain friends, pick “Friends except…” and choose the accounts you want to exclude. The flexibility here allows you to tailor visibility to your specific privacy needs.
Practical scenarios and recommended settings
Which setting should you use? It depends on your goals. Here are a few real-world scenarios and the options that best fit them.
- Protecting your contacts and avoiding spam: Choose “Only me” to hide facebook friend list completely. This prevents strangers or malicious users from harvesting names and profiles.
- Keeping your friends private but maintaining normal friend interactions: Choose “Friends” so your friends can still see your network but the public cannot.
- Hiding connections from specific people (e.g., coworkers or exes): Use “Friends except…” to block specific people from viewing your friends list while keeping it visible to others.
- Sharing with a small circle: Use “Specific friends” if only a few trusted people should see your friends list.
Whichever option you pick, remember to tap “Save” to apply the change.
Tips to further protect your privacy on Facebook
Hiding your friends list is a great step, but privacy on Facebook is made up of multiple settings. Here are additional recommendations to complement hiding your friends list:
- Review “Who can send you friend requests” in the same menu to limit friend request sources.
- Use the “View as” feature on desktop to see what your profile looks like to the public or a specific person (this helps verify your settings).
- Consider using the “Restricted” list for acquaintances who you don’t want seeing private posts.
- Regularly audit your profile and timeline visibility, story settings, and photo albums.
- Block or unfriend persistent snoopers or people you no longer wish to connect with.
Limitations to be aware of
Hiding your friends list reduces visibility, but it has some limitations you should know about:
- Mutual friends may still appear when someone views your profile if you and the viewer share friends.
- People may still discover mutual connections through comments, groups, and tagged posts.
- Search results and other features may still surface your profile even if your friends list is hidden—changing the friends list setting doesn’t make your entire profile invisible.
Even with these limitations, hiding your friends list is an effective privacy measure that reduces casual exposure of your network.
Quick checklist before you finish
Before you leave Settings, run through this quick checklist to make sure your desired privacy level is set:
- Did you set “Who can see your friends list” to the option you intended (e.g., “Only me” or “Friends”)?
- Did you tap “Save” after choosing the option?
- Do you want to change “Who can send you friend requests” while you’re in the menu?
- Do you want to test your profile visibility using “View as” on a desktop?
Final thoughts
Learning how to hide facebook friend list is one of the easiest ways to take control of your privacy on the platform. In just a few taps you can prevent strangers from seeing who you’re connected to, reduce the chance of unwanted outreach, and manage who has insight into your social circle. I recommend setting it to “Only me” if privacy is your top priority, or “Friends” or “Friends except…” if you want a balanced approach.
If you found this walkthrough helpful, try changing the setting now and take a minute to explore the other privacy options in Facebook’s “Audience and visibility” menu. A small change can make your account feel a lot more private and secure.
Thanks for reading—hope this helps you hide facebook friend list and keep your connections the way you want them. See you next time!
More privacy tips
Hiding your friends list is a great start, but consider a few extra steps to lock down your account: enable two-factor authentication, review third-party app permissions, and regularly check active login sessions to spot unfamiliar access.
How to verify your settings
Use the “View as” tool on desktop to confirm how your profile appears to the public or a specific person. On mobile, ask a trusted friend to check your profile or use a secondary account if you have one.
Quick FAQ
Q: Will mutual friends still be visible?
A: Yes — mutual friends can still appear in some contexts even if your friends list is hidden.
Q: Does hiding my friends list make my whole profile private?
A: No — this setting only controls friends list visibility. Review timeline, posts, story, and photo privacy separately for broader protection.
Privacy checklist before you leave
- Confirm “Who can see your friends list” is set to your preferred option and hit “Save.”
- Adjust “Who can send you friend requests” if you want fewer incoming requests.
- Audit past posts, tagged photos, and audience settings for sensitive content.
Adding this short block to the end of your post gives readers concrete next steps and answers common follow-ups after learning how to hide their Facebook friend list.